Learn more ProPresenter is now available as a subscription!
Probably the biggest step in integrating video into your services is moving from a single video signal to multiple video signals. Generally, this means upgrading from a computer hooked directly into projectors to display words and graphics, to a video switcher or switcher scaler with one or more computers, cameras, playback devices, etc. as inputs, with the output going to the projectors.
Usually when this step is made, it is done with the desire to combine, or “composite” the words generated from the computer to the other video signal inputs using a technology called “keying”. When you make this leap, you will be well served to understand how to “key” the words generated from the computer over the other inputs, and the pitfalls that can occur with the keying process.
The Basics of Keying
Think of keying as you would stencils. Do you remember those pieces of cardboard that had holes cut out of them in the shapes of letters so that you could spray paint words onto signs? Keying involves three different pieces: the “key” signal, which is analogous to the stencil; the fill signal, which is analogous to the spray paint; and the background, which is the cardboard we are spraying the paint onto. Keying is more sophisticated than this, though, as you also have ways of limiting the amount of spray paint, or fill transparency, that you see on the image.
In video, our stencil, or key channel, is visually shown as a grayscale image… every part of the image that is pure white is a big hole that lets the fill image (our paint) show through. Every area that is pure black is opaque and lets no part of the fill image show through. Every shade of gray is a level of transparency of the fill image. As such, if a part of the key image is 50% gray, then the fill is 50% transparent.
When we talk about the three most common types of keying (Chroma keying, Luminance keying, and Linear Keying) we are basically talking about how this grayscale key image is created so that we know how much of the fill signal to let through.
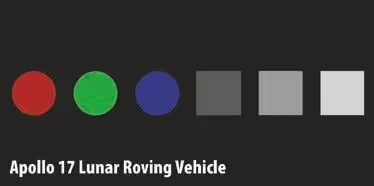
Luminance and Chrominance keying use some kind of video source and create the key dynamically based on how bright the image is (Luminance), or a specific color (chrominance). For the example graphics, we are going to use a stock photo taken on the moon.
Chrominance Keyer (Chroma Key)
The easiest way to understand Chrominance keying is to think about the weatherman standing in front of his weather maps. If you’ve ever seen a TV studio, you would notice that he’s actually standing in front of a blue or green screen. Special keying equipment takes out this green or blue color to reveal the background behind him. So, to continue our stencil analogy, the three pieces are:
• Stencil/Key Image – created dynamically the weatherman standing in front of the green screen — if you were to look at this key image you would see a white silhouette of the weatherman over a black background.
• Spray Paint/Fill Signal – This actually comes from the same image used to calculate the key image… it is the weatherman standing in front of the green screen.
• Cardboard/Background – This is the weather map that we want to project
the weatherman on to.
When the keying processor combines these signals, the resulting image is what you see every night on your local news. As these news stations use sophisticated (read: expensive) keying equipment, it is smart enough to keep track of shadows within the keyer, so it appears that the weather anchor’s arm is casting a shadow on the map.
In the sample images, we have a figure against a green background. The keying mechanism ignores all the green information and lets anything that is NOT green show through, thus creating a composited image of the figure standing on the moon.
Pros of Chroma-keying: Most every video switcher and switcher scaler that has “keying” capability is usually some form of a Chroma key. Most of the switcher scalers that say they also have Luminance keying are basically using a black color signal for the key.
Cons of Chroma-Keying: You are limited in that you cannot use the key-color anywhere within the graphic that you want to show up on the screen because it will appear transparent when keyed out. Also, note the ghosting effect issues.
The Ghosting Effect
One of the biggest problems with luminance and chrominance keyers is the fact that you are usually using the same signal for both the key and fill. This becomes a problem when you are dissolving between two different text slides.
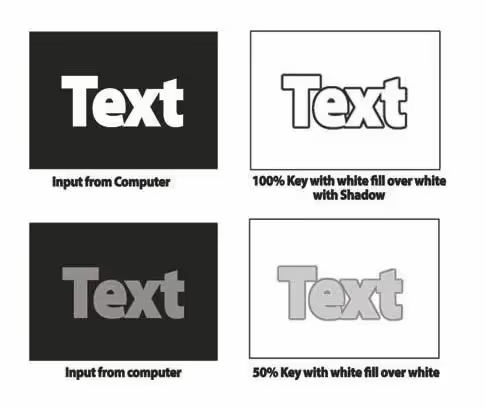
For example, let’s say we set the tolerance on a luminance keyer to about 50% with white words on a black background. As such, you can say 50% gray means 50% transparent so that as the text fades to black, it gets more and more transparent.
The problem is, if your fill signal is the same as that which is generating your key, then as white text turns to black, it goes through 255 different shades of gray. The result is that although the text is becoming transparent through the keyer, it is also turning darker. This creates a “ghosting” effect where dark residue is briefly seen where white words used to be as you transition from one set of words to another.
If your switcher has the ability to specify a matte white fill, then this will work very well with the keyer, because regardless of what level of transparency is specified by the key channel going from white to black, the text will simply appear as some type of transparent white text.
Luminance Keyer (Luma Key)
Luminance keyers work best when what you want to show on the screen is brighter than the background you are using, such as white words. Usually, you use this kind of a key with computer generated graphics. Using the example of white words on a black background, you specify the tolerance level of brightness from which you wish to create your key. It’s important to note that in video, 100% bright is pure white, so that is 100%. Any color or shade of gray would be less than 100%. So, if you specified 100% white as your tolerance, then any shade of gray under 100% would not be shown over the background.
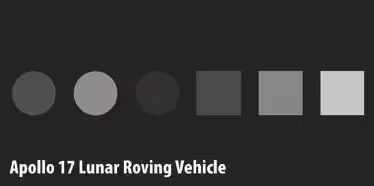
In the examples (above) we’ve specified a matte white color as the “fill” for the key, which means that the graphic will be composited with the background using various transparencies of white. To demonstrate this, the image that is defining the key signal has color in it, but because a luminance keyer pays no attention to color, the mask created by the keying device is made up of various levels of gray. Because we’ve specified the fill signal to be pure white, the circles and squares appear at various levels of a transparent white over the background image. If we had used the same image as both the key signal and the fill signal, the circles would be their respective colors, with the same transparency levels as what is shown on the composited white image.
Pros of Luminance Keyers: If you are showing white or single color lyrics over a camera signal, luminance keyers will generally provide better results than a chroma-keyer. This is because the tolerances of the transparency make for cleaner keys, particularly in lower-end switchers that don’t give much control over the tolerance of colors that you want to key out in a chrominance key. Also note that high-end switchers will often have a border or shadow option that will generate borders/shadows internally from the same key signal using a color you specify. There is no “ghosting effect” if you use a separate color-fill from the key signal.
Cons of Luminance Keyers: They are usually only available in higher end switchers (as noted earlier, the low-end switchers and switcher scalers often will call their keying devices “luminance key” capable, but they’re really just doing a chroma-key of black which is not the same thing); You cannot have dark colors as part of your visible image as it will show through as transparent. The “ghosting effect” is also present in luminance keyers (see above) if you use the same signal for both your key and fill.
Linear (Alpha) Keyer
The problem with the Chrominance and Luminance keys is that they limit the number of colors that appear as part of your key. For example, if you do a chrominance key on blue, then nothing blue can appear as part of your image that you want to show on screen. If you do a luminance key, nothing black can show up on your key. An “Alpha” or “Linear” key sends a separate video signal to the keying device that contains the key information. This video signal just looks like a grayscale image and defines the way the fill signal is supposed to be overlaid on the background.
In the example images, notice that the key channel has some transparency on the trail of smoke coming out of the airplane, and that the red title at the bottom of the screen has a gradient that fades to nothing. The composited image shows the clean results of being able to explicitly specify this level of transparency.
In ProPresenter, you can send the two separate SDI signals using certain DeckLink or UltraStudio hardware, or you can use ProPresenter’s streaming capabilities, and have the software receive a video and do all the keying before streaming the final result. One of the benefits of streaming directly from ProPresenter is not having to worry about keying. Your graphics, text, and video inputs can all layer on top of each other for the cleanest and highest quality broadcast feed possible.
Pros of Linear Keys: It is the gold-standard of keying systems as it allows the mask to be explicitly specified and thus gives you the full range of colors and transparency of one signal over another. As such, you can create feathered, transparent shadows on your computer that will look beautiful when composited over a background.
Cons of Linear Keys: Requires more expensive computer hardware, as well as two separate video cables.
By subscribing, you agree to our Terms and Conditions.
Experience the power of ProPresenter
Take your production to the next level with ProPresenter's intuitive suite of tools.
Stay Updated with Our Newsletter
Get the latest news, updates, and exclusive offers delivered straight to your inbox.
Questions?
Browse our FAQs or our Knowledge base that we’ve made to answer your questions. Need additional help? Connect with a support team agent!